Make the Best Vanilla Layer Cake (the perfect party cake)
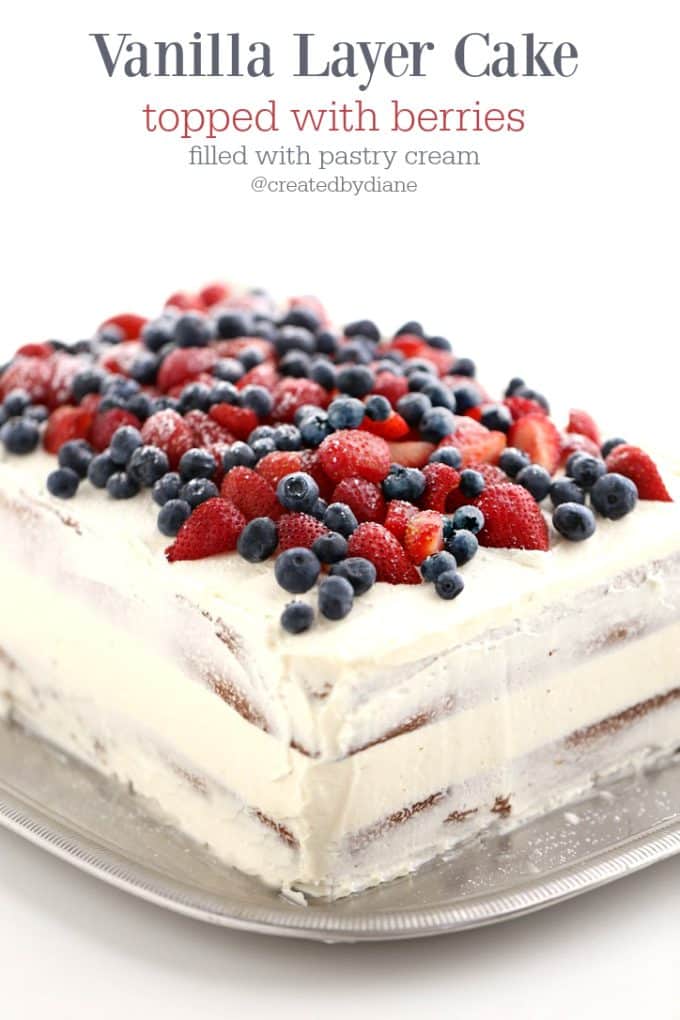
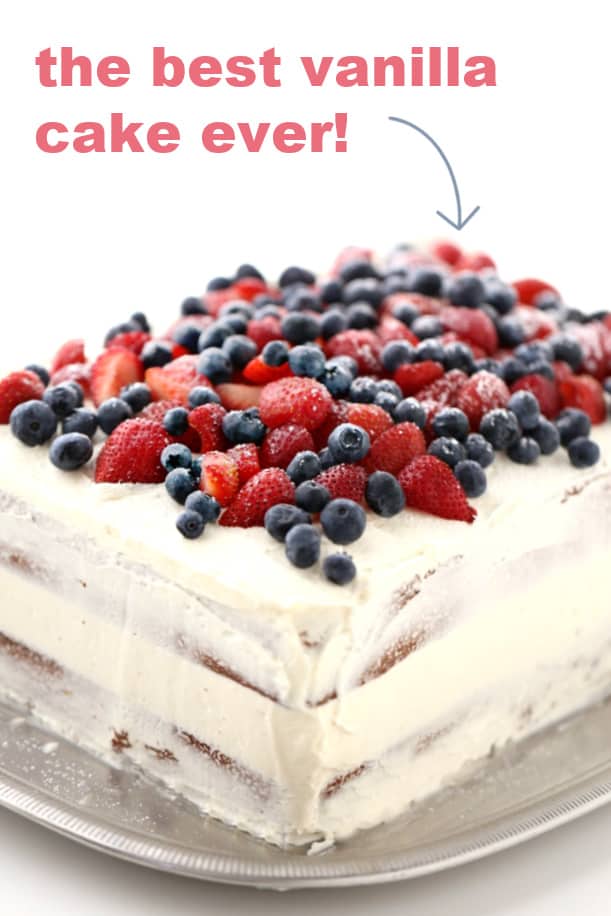
Try this 2 layer delicious vanilla cake is filled with pastry cream, one bite and you’ll be hooked! The perfect party cake, it feeds a crowd! No need to worry about fancy decorating, just pile on the berries and you’re all set to serve it!
You know what I mean about fussing… I don’t want to spend hours frosting and worrying how it will turn out.
Don’t get me wrong, I always want it to look pretty.
I just don’t want to have to fuss with it.
This is THE CAKE! There is no fuss, it tastes amazing and does not take all day to make.
I love the new “naked” cake style, it’s kinda like when shabby chic became the style, I love that too.
I like that it looks pretty without being fussy or overdone.
There are many ways to top the cake to have it be just what YOU want.
I added strawberries and blueberries, other options are pineapple and coconut, fresh peaches with a drizzle of caramel, raspberries, and blackberries would be great also.
If you want to add some chocolate, a hot fudge sauce drizzled over the top and down the sides or chocolate curls.
If you prefer candy to fruit top the whole cake with your favorite candy! M&M’s or Butterfinger, Snow-Caps to Swedish fish, the possibilities are really endless.
This cake is the PERFECT cake for every day celebrating and especially July 4th, Memorial Day, Veterans Day, Patriotic Holidays in general and for anyone who loves America… each and every day. I served this at a party and it was wonderful!
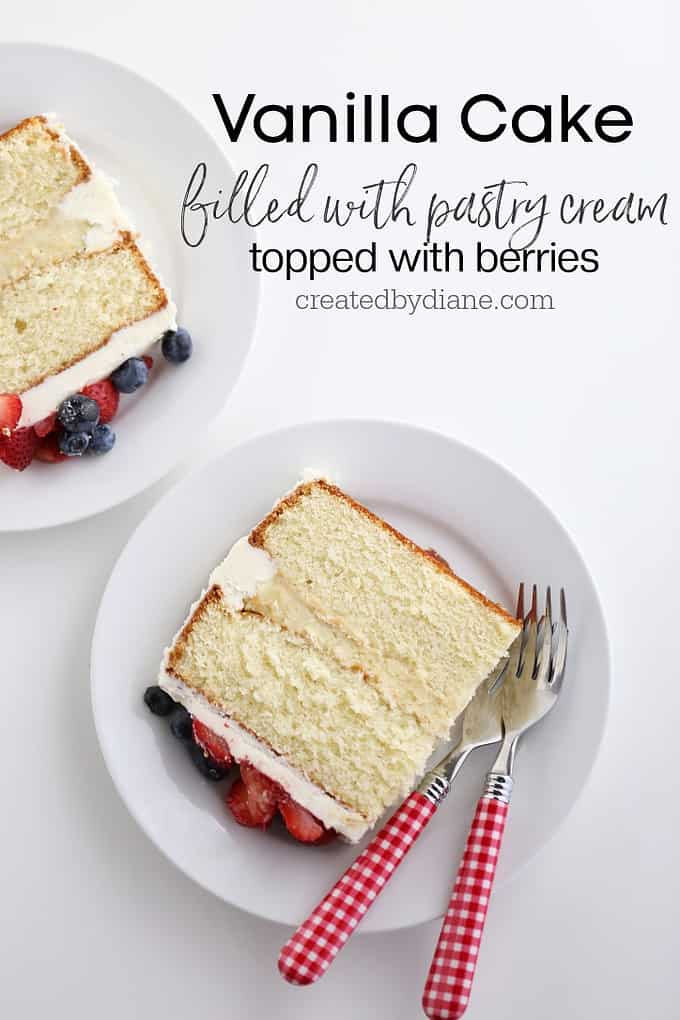
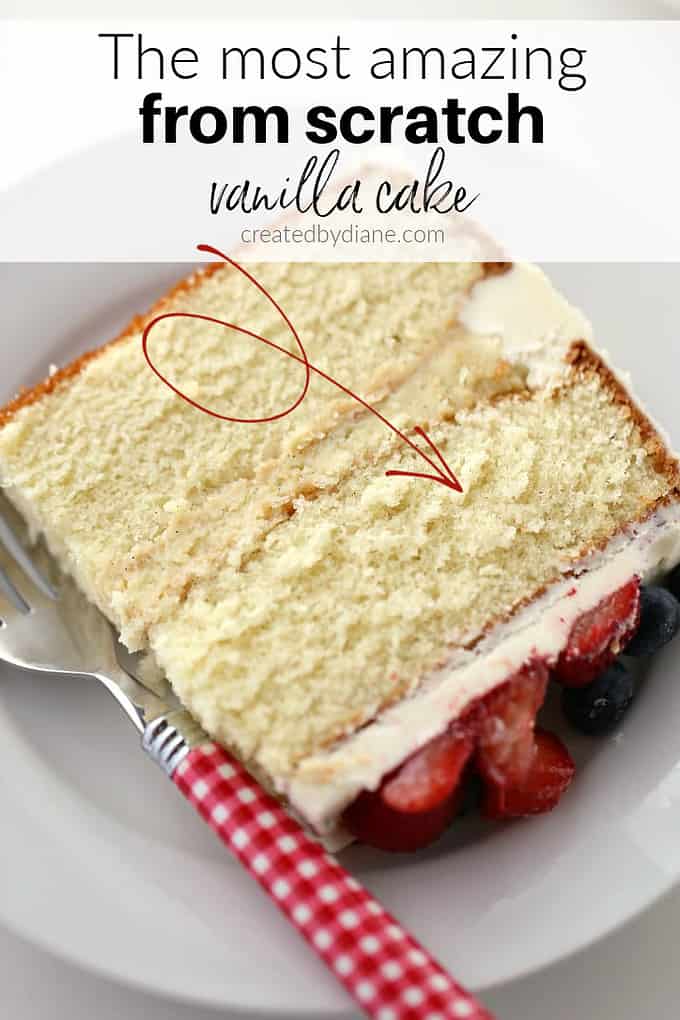
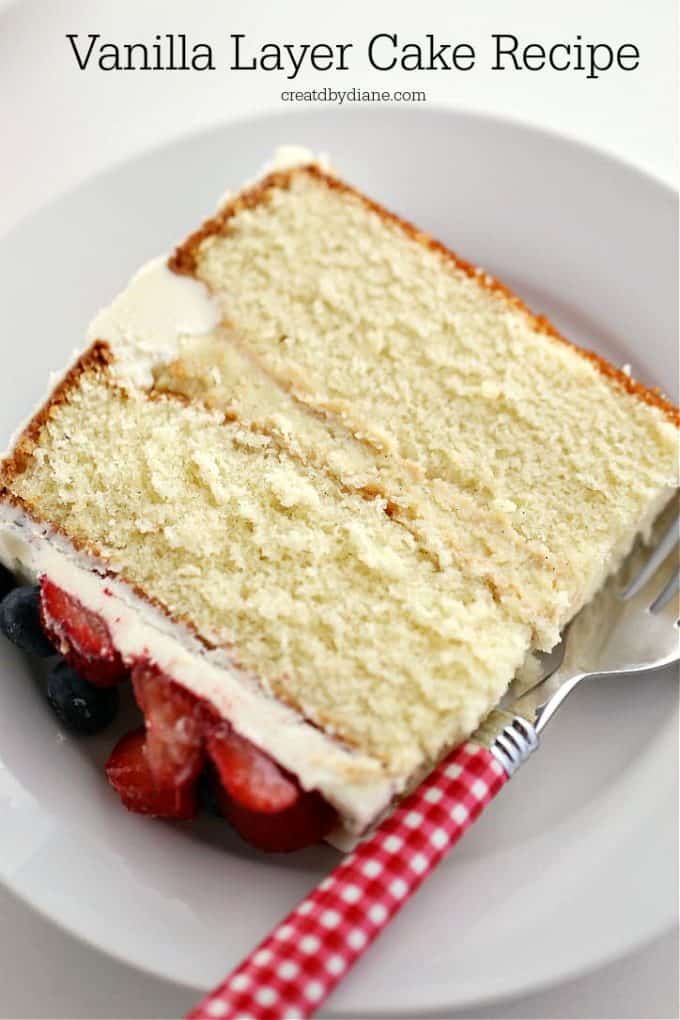
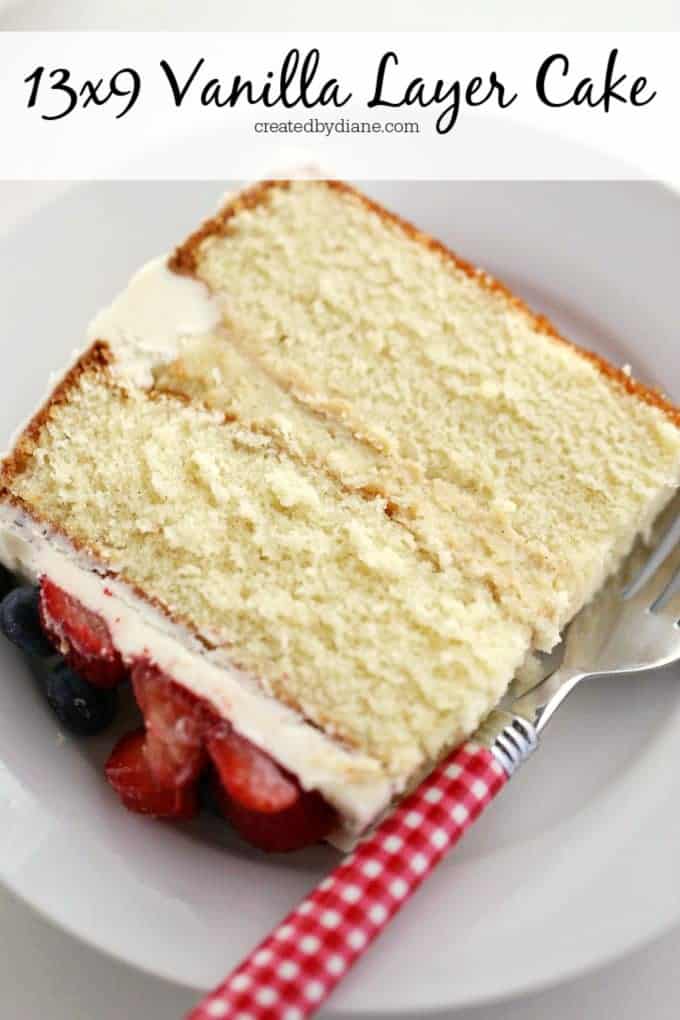
The cake is made of two delicious vanilla cake layers with vanilla pastry cream slathered in between them, it’s not overly sweet so you can certainly add a topping to it without pushing the sweetness over the top.
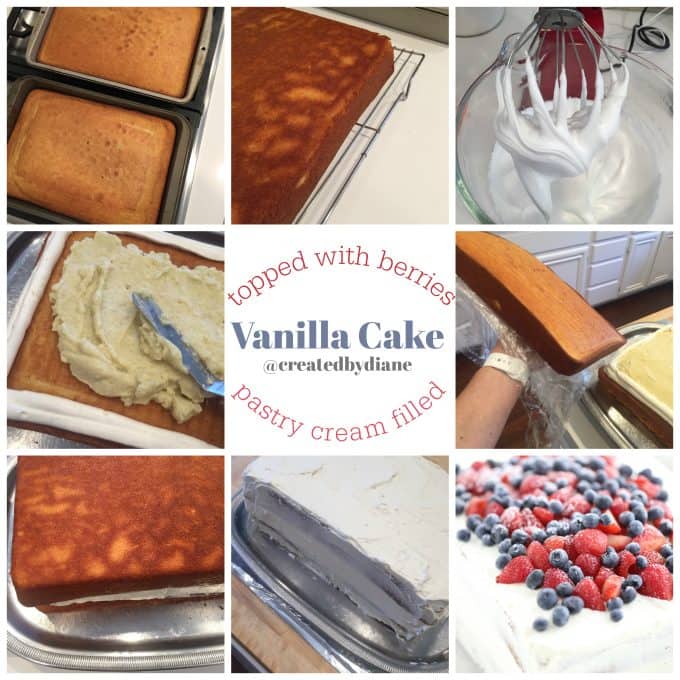
I find it easier to work with sheet cakes to bake them at least a day ahead of time.
Often I bake the cake two days ahead of time and then fill and crumb coat the day ahead and do the final coat of frosting or whipped cream the day of serving if time permits.
Large sheet cakes are easier to handle when they are firm, I allow the cakes to completely cool and then I wrap each layer twice in plastic wrap and place them on cardboard and put them into the freezer, to be sure they will freeze straight.
They are easier to handle, and the cake stays moist, they are firm and easy to work with, freshly baked cake, is floppy and crumbs a lot if you try to frost it after it’s baked fresh.
This is my favorite cake for a party.
It makes a large cake, you can make 2 batches of frosting if you prefer to frost the cake generously and not have a “naked cake” I will mention everyone loved that there wasn’t SO MUCH frosting on the cake, and this frosting is not overly sweet, but oh so delicious.
There are quite a few steps and instructions to make this cake, but it’s not too complicated.
It takes some time, but when you are done making this cake you and your cake eaters will LOVE you for it.
What should I do with leftover cake?
If you happen to have leftover cake, you can slice the cake and wrap them in plastic wrap and freeze them and take them out whenever you’d like a slice!
THIS is a great spatula to use to smooth the sides of this or any cake.
Be sure to check out these other Patriotic Recipes
- Red, White, and Blue Swirled Rose Frosted Cupcakes
- Strawberry Shortcake
- Red Velvet NO-Bake Cheesecake
- Patriotic Cake
- Spritz Cookies filled with frosting and fun patriotic sprinkles
- American Flag Cupcakes
- red white and blue spaghetti
- Cherry Pie Cookies
- Patriotic Pretzel Wreath
- Frosted Sugar Cookies
Looking for more vanilla cake recipes?
This is my favorite vanilla cake recipe! I’ve baked it many ways, halved it, and such. Take a look at the other ways to bake this delicious vanilla cake:
I’ve made it into a single-layer cake and cupcakes.
- Here is the post on cupcakes that are filled.
- Here is a small batch of cupcakes
- Here is the single-layer cake, which I happen to make all the time it only takes an hour from start to finish!
Vanilla Layer Cake
Ingredients
- 4 cups sugar
- 8 eggs
- 5 cups all-purpose flour
- 5 teaspoons baking powder
- 2 cups whole milk
- 2 cups unsalted butter melted and cooled for about 45 seconds in the microwave
- 1/2 cup oil
- 4 teaspoons vanilla bean paste or vanilla extract remember the better quality vanilla the better this cake will taste.
Pastry Cream
- 4 egg yolks
- 1/2 cup sugar
- 1/4 cup cornstarch
- 1/4 teaspoon salt
- 2 cups whole milk divided 1/2 cup and 1-1/2 cups
- 4 tablespoons unsalted butter
- 2 teaspoons vanilla bean paste or vanilla extract
Italian Buttercream Frosting
- 2 cups sugar separated into 1 cup each
- 1/4 cup water
- 5 egg whites
- 1 pound 4 quarter sticks room temperature butter (not soft) cut into tablespoon pieces
- 3 teaspoons vanilla extract
Decorating Cake
- 3 cups strawberries and blueberries
- powdered sugar to dust over the top of the cake
Instructions
- Preheat oven to 350° (325° for dark pans)
- Use a baking spray to prepare 2-13X9 baking pans then place parchment on the bottom of each pan and give the parchment a light spray to ensure the cakes will release easily after being baked.
- In a large mixer bowl beat sugar and eggs.
- Mix in flour, baking powder, milk, butter, oil, and vanilla.
- Mix until smooth and completely blended.
- Pour batter evenly into each pan and bake for 35-40 minutes or until a toothpick comes out fairly clean, do not overbake. Check the cake every minute if needed to be sure you don’t overbake it.
- Allow the cakes to cool until cool, about 30 minutes, then release them from the cake pans onto cooling racks until the cakes are completely cooled.
- I typically bake large cakes like this a couple of days ahead of when they are needed, so I can freeze the cake to make it easier to frost and they stay moist and stay together nicely without crumbling and falling apart when sliced.
- I wrap my cakes at this point with plastic wrap and put them in the freezer. I put them on cardboard to keep them flat so they hold their shape.
- Freeze the cakes until firm (a couple of hours at minimum to a few days- if you will be freezing them for more than a few days be sure to wrap them extra well so there is no frost on the cakes when you go to take them out of the freezer).
- Unwrap the cakes and allow them the cakes to be at room temperature for 20 minutes to be able to handle them and stack them with filling. They won’t bend much, so level cakes are best. I don’t prefer to trim my cakes so I place the tops of each cake in the center and add the filling to adjust for any unevenness.
- *I prepare the filling the day ahead so it’s really cold and will fill in the middle of the cakes nicely.
- I like to prepare the frosting the day I’m using it.
Pastry Cream
- In a medium bowl mix sugar with cornstarch and salt together, then add 1/2 cup milk and whisk smooth.
- In a small bowl mix egg yolks, then add the egg yolks to the mixture and blend until creamy.
- In a small saucepan heat the remaining 1-1/2 cups milk to a simmer (small bubbles around the edge, not a full boil.
- Slowly pour the heated milk into the egg mixture while whisking constantly allowing the egg mixture to heat slowly and evenly to prevent the eggs from scrambling (if you have any lumps or egg pieces place this mixture through a fine strainer)
- Place the mixture into the saucepan and heat over medium-low heat until it boils about 5 minutes.
- Remove the pan from the heat and stir in the butter and vanilla.
- Place the pastry cream into a bowl and cover it with plastic wrap and allow it to cool, then put it in the refrigerator to get cold. (you can make this ahead of time even a couple of days)
Italian Buttercream Frosting
- Separate egg whites into the bowl that fits a mixer, use the whip attachment.
- Whip the egg whites with 1 cup sugar until stiff peaks form.
- In a small saucepan, bring the other cup of sugar and the water to a boil and allow the temperature to come to 245° degrees.
- Immediately remove the pan from heat and d=rizzle the syrup mixture into the whipped egg whites mixture on medium speed.
- Once you’ve added all the syrup bring the speed up a bit to medium-high and mix until the bowl is cool to the touch. Put it on high if needed this takes about 10 minutes.
- Place the flat paddle attachment onto the mixture.
- Add in the butter a tablespoon at a time and mix on high.
- Drape a towel over the bowl so it won’t spatter.
- Keep adding the butter while the mixer is going until all the butter is added and it’s creamy.
- If it looks curdled, keep mixing it could take 20 minutes if it’s hot or there is a lot of humidity, put an ice pack on the mixer bowl if it needs chilling to become smooth. Alternatively, if you happen to refrigerate the mixture and need it warmed up to whip it, place a warm wet towel around the bowl.
- Add in vanilla.
- You can keep the frosting at room temperature for 2-3 days. If it’s really hot in your kitchen or outside, you can put it in the fridge to chill it a bit if the frosting is cold allow it to come to room temperature and re-whip it before using it so it spreads nicely.
ASSEMBLING CAKE
- Place the first layer of cake on your serving tray, pipe some frosting around the edge, and spread the pastry cream filling over the cake layer.
- Place the second layer of cake.
- Spread the frosting smoothly over the cake.
- Reserve a small amount of frosting to spread over the top when you will be adding the berries so they stick into the frosting.
- I added about 3 cups of berries onto the top of the cake and before serving it, dusted the cake with powdered sugar.

MORE Patriotic Recipes
- Red White and Blue Patriotic Cake – vanilla cake colored buttercream
- 8” round American Flag Cake a simple cake you’ll make again and again
- Patriotic tye dye cake fun and easy to make white cake with colored frosting
- Red White and Blue Patriotic Cake – vanilla cake-colored buttercream
- Cherry Pie Cookies – deep dish vanilla cookies with cherry filling
- Red White and Blue Tart Fruit tart
- Vanilla Layer Cake 2 layer sheet cake with pastry cream, topped with berries
- Patriotic Spritz Cookies butter cookies perfect for celebrating the USA
- American Flag Cupcakes so cute, and easy to decorate
- Frosted Sugar Cookies to look like the US Flag
- Red White and Blue Colored Cake Batter- cupcakes
- Star Cookies with sprinkles in red white and blue and a template for giant cookies
- Red Velvet Pancakes with Cream Cheese Glaze perfect to start a patriotic day
- Fruit Squares Cake– apple, blueberry, cherry looks like a flag
- Red White and Blue Spaghetti a fun meal everyone will rave over
- Red White and Blue deviled eggs so fun every celebration needs these
- Red Velvet No Bake Cheesecake pretty, delicious and no oven needed
- Red White and Blue Tie Dye Cookies fun cut out cookies in patriotic colors
- Chocolate Ice Cream Shaped Cookies in cones with patriotic sprinkles

this looks amazing and l would really like to try it. what is the size of your cup? I have 3 different measuring cup sizes.
I use US measuring cups, 1 cup is the marking on the measuring cup (if in the recipes it says 3 cups, you fill the measuring cup flat to the top rim, 3 times) flour and sugar do weigh different, if you use a measuring scale typically, be sure to know accurate measurements of each type of ingredient
Hi Diane!
I’m making my brothers-in-law wedding cake and thinking about using this recipe. Do you think this will work well as a 4-tier cake? If so, how can I adjust the measurements for two 14” rounds, two 12” rounds, two 10” rounds and two 8” rounds?
Thanks in advance!
Lindsay H.
Hi Lindsay,
I didn’t measure exactly how many cups of batter I put in each cake pan. But I do always make sure the same amount is in each pan. Since they are 13×9 pans and look to be about 1 1/2 inches at least when completely cooled (baked in 2-inch pans) I use this chart https://www.wilton.com/cake-serving-guide/cms-baking-serving-guide.html but do not believe I had 20 cups of batter, but all cake batter is different so this will be an estimation. Let’s assume my cake had 15 cups of batter. You’ll need 57 cups of batter based on the cake sizes you listed. So you’ll need to make 4 batches of the cake recipe I listed. Of course, be sure you have enough ingredients if you need to make more batter. I have this recipe broken down in smaller portions that work, email me directly if you need me to send you more info as I baked the cakes many times to be sure if for example I wanted 1-8″ cake it was exactly the same texture and taste and rise as with the larger sized recipes. HERE is the 8″ single layer recipe https://www.createdby-diane.com/2019/04/8-inch-round-vanilla-cake.html
Diane,
Thank you so much for your response!! I am just now seeing it because for whatever reason my email didn’t alert me that you had replied. I ended up making this cake as a 5-tier semi-naked cake decorated with a few real flowers and it was a HUGE hit. This recipe is fabulous!!
I now have a second question. Since I love this recipe so much, I’m wondering if it can be adapted into a strawberry cake?? I just have no idea where to start with measurements, how much strawberry to add in and if I need to take anything away..🤔
I’m so happy you liked the cake!
Making it a strawberry flavor can be a little tricky but here are a few suggestions. Since the recipe calls for 2 cups of milk, you can use about 4 cups of strawberries cut up, boil them down on low for a half hour or so until it’s super thick, syrup-like (do not add water to them). And use maybe 3/4 cup of that syrup into the recipe and add a little more to maybe 1 cup if the consistency of the cake batter seems good. The fruit can weigh down the batter, so that is the tricky part. If it doesn’t rise properly, you’ll then have to adjust other items, like eggs and baking powder. But it would be trial and error really. Alternatively, you can add natural strawberry extract (not the artificial stuff it doesn’t taste very good it can give off a medicine type of taste).
Thank you so much for your help!! ❤️🙏🏻
Can this recipe be half and baked into cupcakes. Looks delicious. Likes the good reviews it has.
Yes!
This is my favorite vanilla cake recipe. I’ve made it into a single layer cake and cupcakes. Here is the post on cupcakes https://www.createdby-diane.com/2015/05/vanilla-cupcakes-filled-with-pastry-cream-and-vanilla-frosting.html those are filled. Here is a small batch of cupcakes (not filled, but you can adjust the pastry cream recipe if you want) https://www.createdby-diane.com/2017/10/small-batch-vanilla-cupcakes.html and here is the single layer cake if you ever need it https://www.createdby-diane.com/2017/06/1-hour-strawberry-shortcake.html which I happen to make all the time!
This is the BEST cake, I’m so happy I found this great recipe. Thanks
Hi Diane. In the instructions for the cake when you say bet the eggs and sugar, for how long do you mean. Is it just until they are incorporated or till the mixture is pale and doubled in volume? Thanks!
You beat the eggs and sugar until they are well mixed and fluffy. 30 seconds to 1 minute on high. Yes they will be paler and almost double in size.
Thanks for your quick response Diane!
Hi …can I make this cake in a pressure cooker with the same ingredients.
I highly doubt it will come out well in a pressure cooker. If you’ve baked cakes in a pressure cooker with good results go right ahead and let me know how it turns out. I’m much more of a traditionalist when it comes to baking cake, I like to know my hard work will result in a perfect cake!
Hi there! Do you think this recipe will be enough for 2 10” cake pans as well? Thanks so much! 🙂
I typically use the Wilton chart to estimate batter portions in pans. https://www.wilton.com/cake-serving-guide/cms-baking-serving-guide.html
My cake pans were probably not filled with 10 cups each, so I think the 10″ pans will work. Be sure not to overfill pans. about 3/4 full, so as the cake expands it won’t run over. Better to have a slightly thinner cake than the batter run over as the remainder of cake won’t bake properly. I suggest placing the batter in a measuring bowl and see how much batter you have before beginning, or measure out a cup of batter at a time into each pan to be on the safe side.
Hello, This recipe looks great. Do you know if this frosting pipes well? I want to make this cake for an occasion so I need to dye the frosting and pipe some decorations. Do you see any issue with dying the frosting?
Do a test with the color so you can see how it looks, it does have a different consistency than American buttercream, some colors look better than others. Here is the frosting piped onto a cake https://www.createdby-diane.com/2013/09/vanilla-wedding-cake.html
Other options if you want to use this frosting are to add sprinkles for color if the color doesn’t look as you thought it would.
Diane, I read in your Vanilla Layer Cake recipe that you can bake, completely cool, double wrap in plastic wrap and place in the freezer for a day or two, and the cake will still be moist, can that be done up to 4 to 5 days? I am having a baby shower for my first grandchild this Saturday, and with all the other planning, setting up, etc, if I can make the cake on Tuesday or Wednesday, then frost and decorate the morning of the shower, that would save me some extra time. Also, is it easier to frost the cake while is it still frozen, or wait until it has defrosted?
Thank you for your advice.
Lisa
Yes, you can freeze the cake for 4-5 days be sure to wrap it really well. If I were you I’d take the cake out of the freezer the day ahead of when you need it. And make the filling and frosting, then you can just give it a top coat of frosting the day you are serving (with berries or whatever you plan to top it with) berries don’t stay well if put on ahead of time. But that will give you time to work with a firm cake and it will have time to thaw completely in the fridge and you’re crumb coat of frosting will set up well, then take it out at of the fridge a couple hours before serving so it’s at room temperature. I find if I try to do it the day I’m having a party I’m rushing too much and the filling and frosting can be done a day ahead. When you take the cake out of the freezer I wait about 30 minutes to frost, I use this time to make the frosting typically, but I make the filling ahead of time so it’s really cold (as the warm filling will become runny and spread too much. (Bake on Wednesday, freeze cake at end of night, make filling-anytime before you plan on frosting- Friday take out of the freezer, make the frosting, then pipe the first layer, add filling, and give the cake a light coating of frosting, put in the fridge. Saturday, add a layer of frosting on top and berries and set in the fridge for about an hour, then take out to get to room temperature to serve.