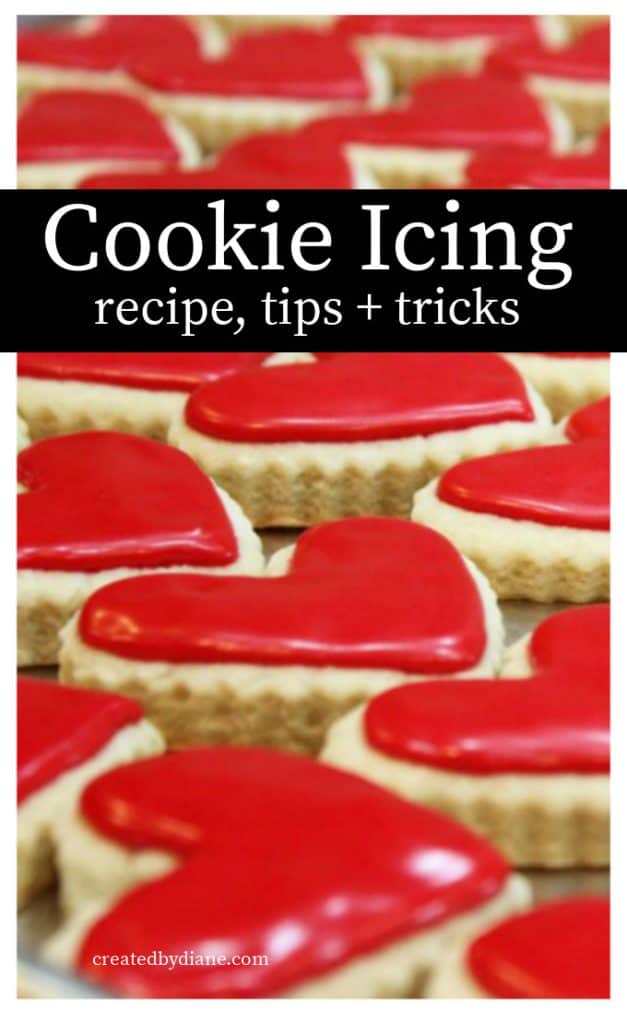
Icing Cookies the Easy Way (No Piping Bag Needed!)
Icing cookies doesn’t have to be complicated! In this post, I’ll show you my fast and easy method to ice cookies beautifully, no piping bag required. You’ll also find simple icing recipes and step-by-step tips to get smooth, deliciously decorated cookies in no time.

If you’ve ever looked at perfectly iced cookies and thought, “There’s no way mine could look like that,” think again!
Icing cookies doesn’t have to be tricky or time-consuming. I’m sharing my favorite quick and easy method to get your cookies looking “bakery beautiful” without any fancy tools, no piping bag needed.
Whether you’re making sugar cookies for the holidays or just want a sweet weekend project, you’ll love how simple (and fun!) icing cookies can be.
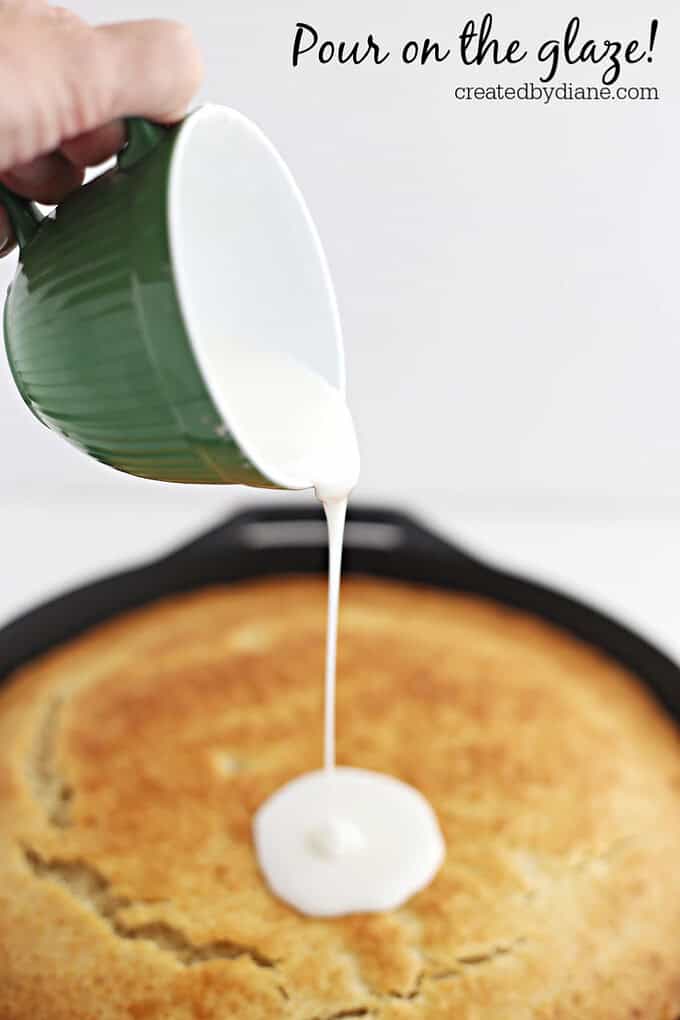
Pour this glaze on cookies, cakes, and any baked item you want to!
You’ll find lots of info in this post, recipes, tips, tricks, and how-tos
I love how pretty iced cookies look, but often they are just so time-consuming.
One day, when I was in a real hurry to ice cookies,
I thought about how fast it seems a donut shop could get icing on all those donuts they sell so early in the morning…
And I decided to simplify and conquer.
- Be sure to watch my VIDEO on icing the cookies below
- Then get my recipe for the icing and give it a try
- And don’t miss my cookie guide and all the cookie posts at the bottom, it’s a must for cookie bakers!
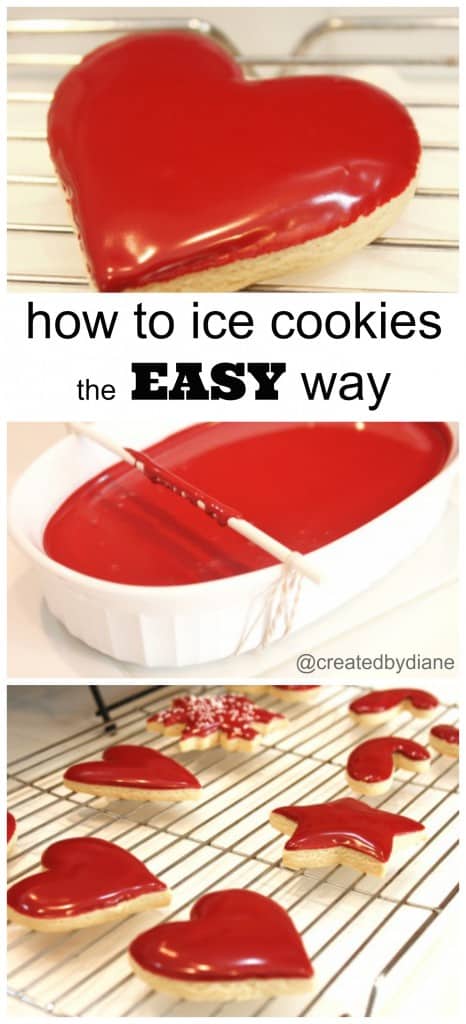
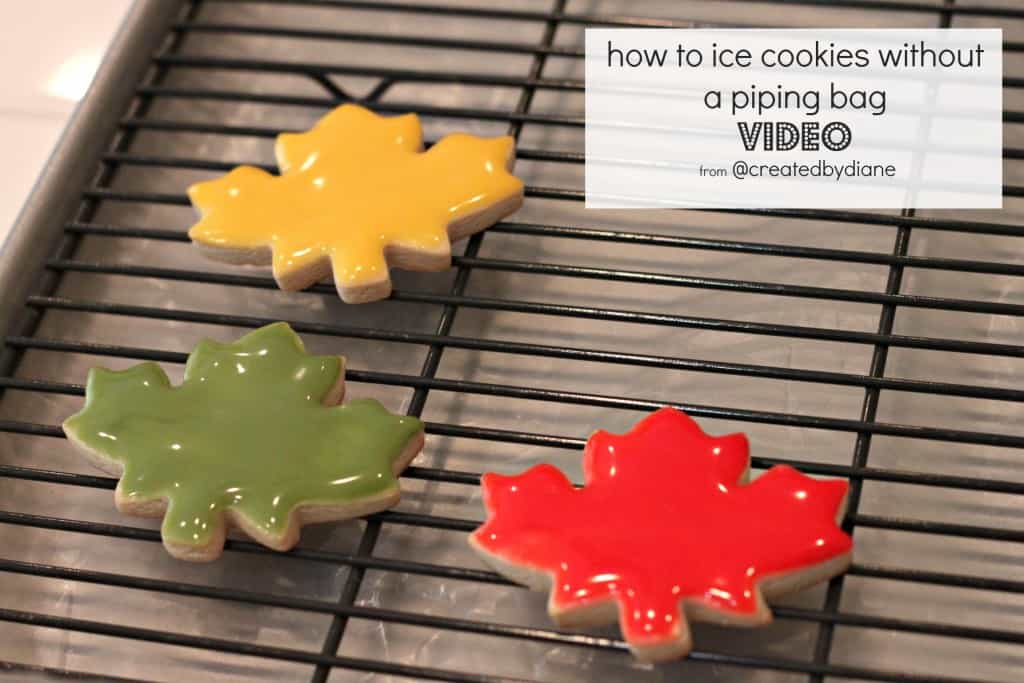
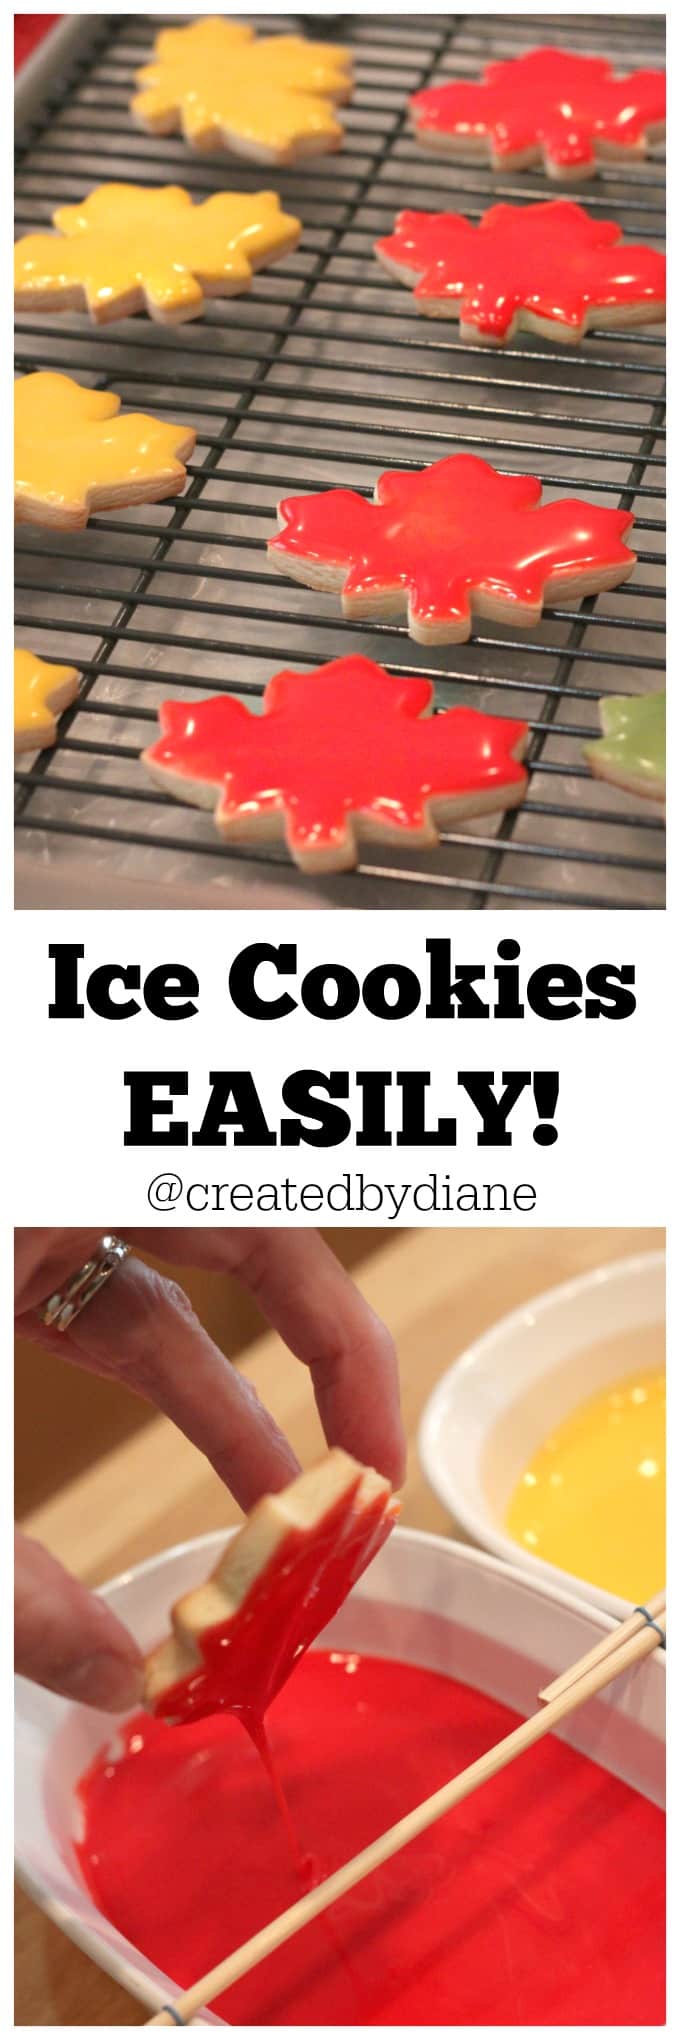
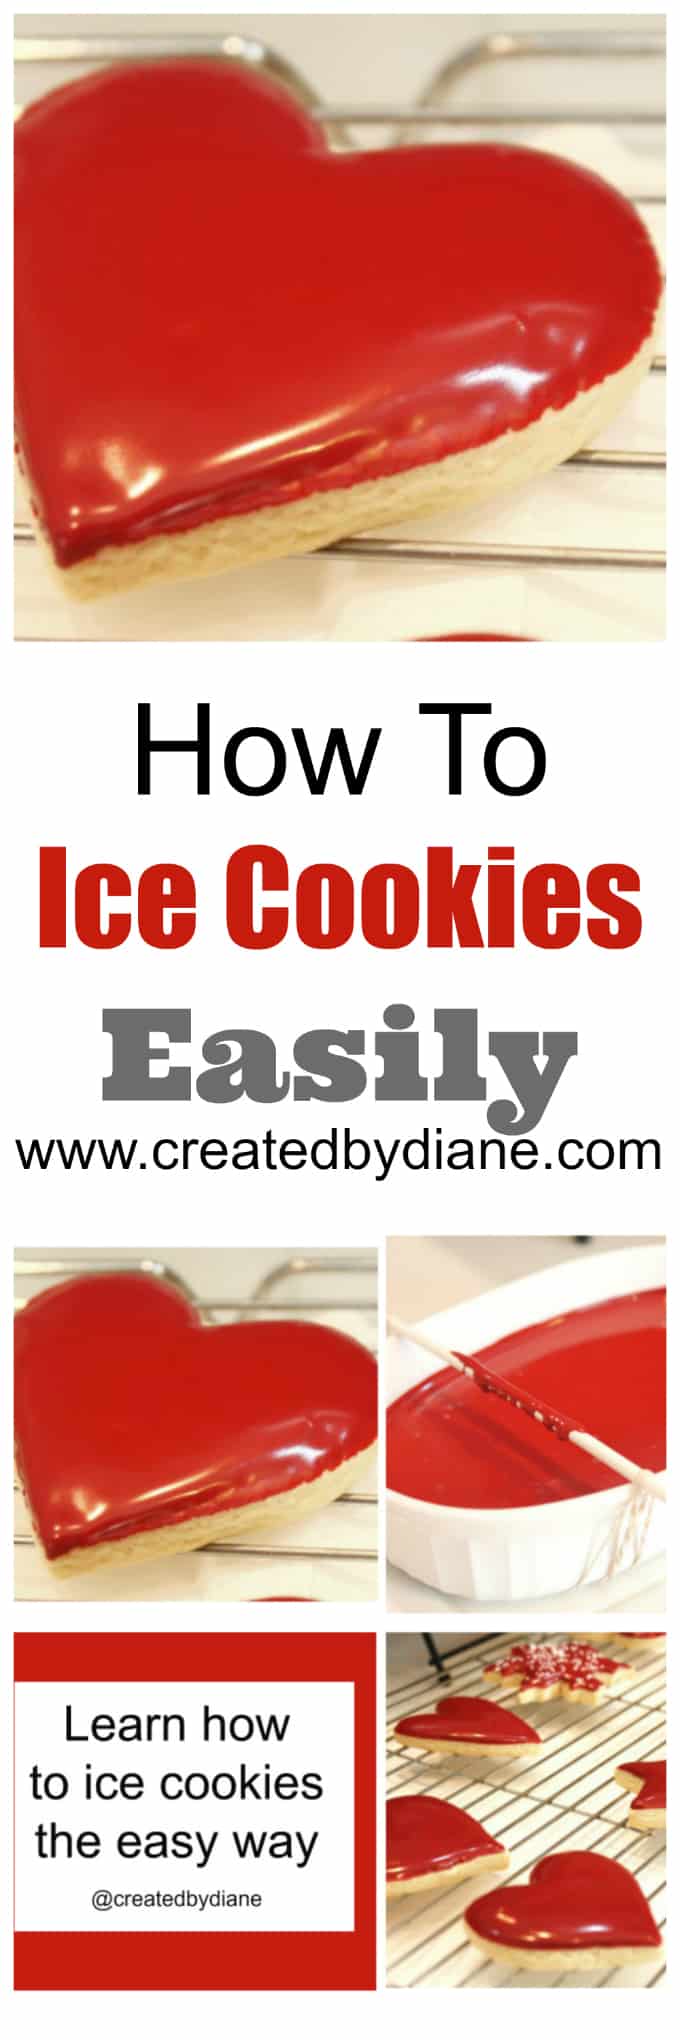
These cookies were iced the EASY way, no piping bag.
I wouldn’t have believed it myself if you had told me so.
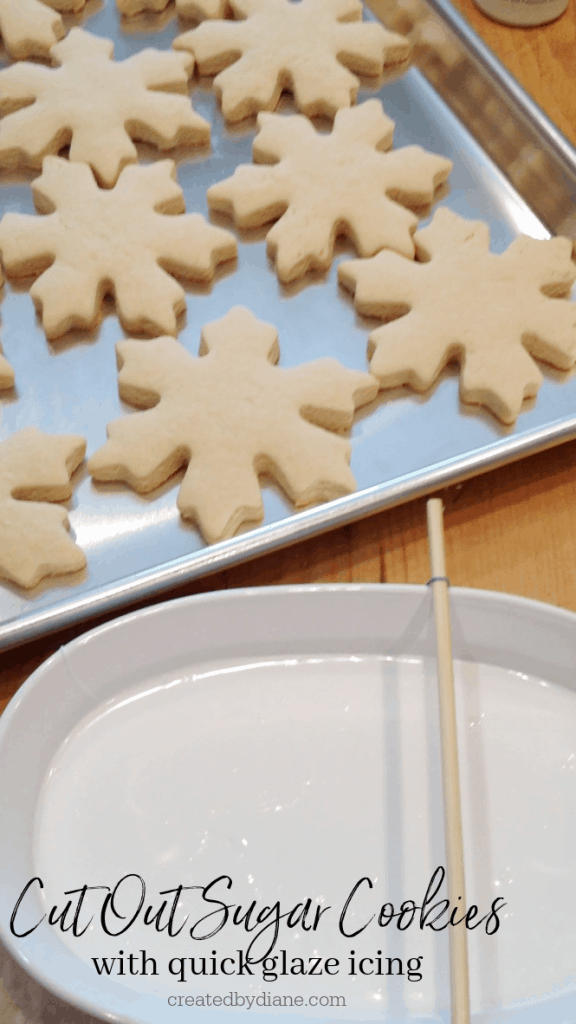
Nope, just dipped them into the glaze icing, and voila!
Below you will find a VIDEO I added so you can see exactly how to do this!
I’m so happy that I figured out a new way to ice cookies, especially since I had 6 dozen cookies baked and ready to be iced, with an annoying pain that was preventing me from icing them.
This dippable icing will save so much time!

It did take me a couple of tries to get the icing correct, along with the method of how to dip them and have the extra icing run off the cookies without making a complete MESS.
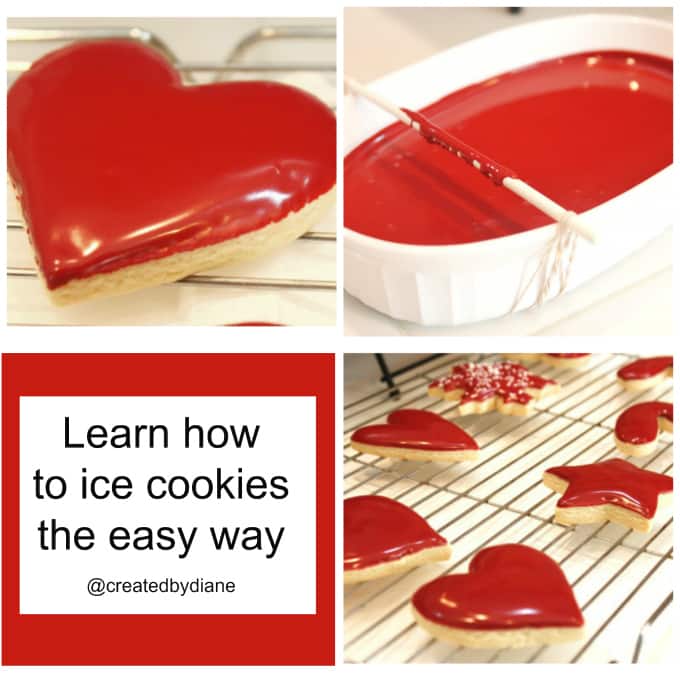
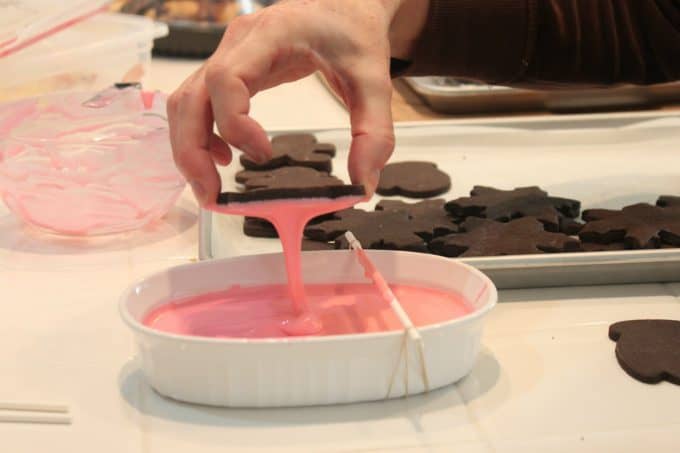
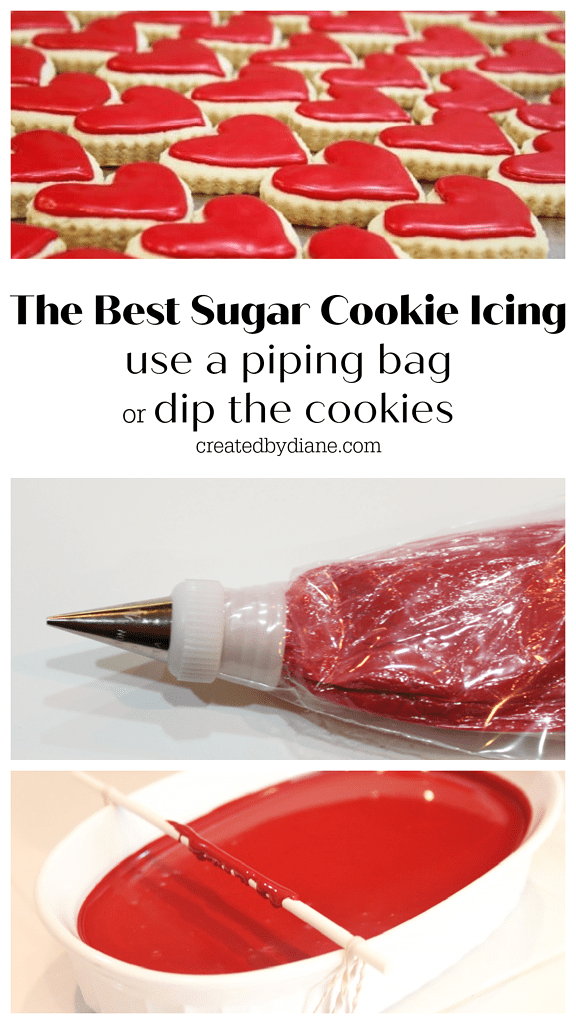
I placed the icing in an oval dish and strapped a lollipop stick with a rubber band, going under the dish attached to each side of the stick.
I love how pretty the cookies that have been piped on look!
But I’m dealing with some shoulder pain right now so this is how I have been icing cookies. I was surprised by how quickly it went,
I finished dozens of cookies in a matter of minutes. (this has become my go-to method, shoulder pain or not, to ice cookies)
I was surprised by how fast this method is. I finished dozens of cookies in a matter of minutes.
What is the easiest way to ice cookies?
This dip and swipe method is fast and efficient.
How do you ice cookies like a professional?
You can use the dip and swipe no piping bag method, or you can use a piping bag for more detailed icing.
I did not scrape the icing off the cookie. I dipped the top edge of the cookies into the icing and then ran the majority of the excess of the icing off by holding the cookie about 1/4 inch away from the lollipop stick, as I moved the cookie from where I dipped it to the other side of the dish.
Then I turned the cookies over onto a drying rack. After icing these, I realized if the cookies were just a little bit thicker, my fingers wouldn’t get in the icing.
The cookies I did with the red icing were just a bit thicker, and it worked, no icing on my fingers!
The lollipop stick helps remove the majority of the excess icing without having to wait for the excess to drip off, without messing up the icing you want to remain on the cookie.
It also allows for an even layer of icing to remain on the cookie, and when turning the cookies upright, no drips went over the edges of the cookies (iced in red, as that was the correct consistency of icing). The pink was too runny and ran over the edges which is why I’m showing you both.
Hopefully, the photos will help you to achieve the consistency needed for smoothly finished cookies.
Dipping icing….instead of piping… GENIUS!

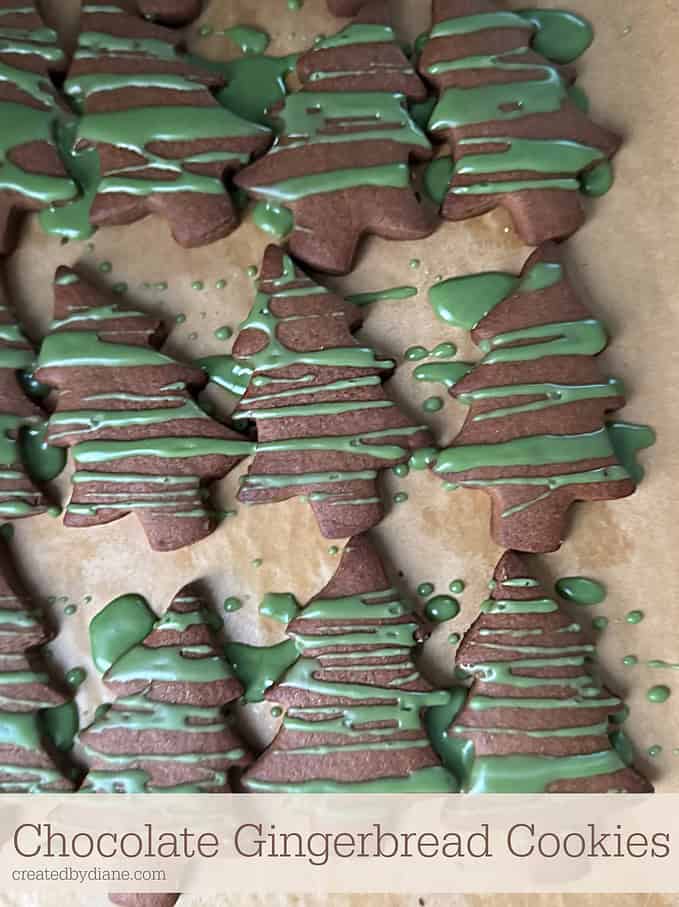
The pink icing was the first batch I had tried to dip into the icing, and it was a little bit runny, so some areas ran over the edge of these Chocolate Cut-out cookies, which, by the way, are Super-Delicious.
* Cookies that are a little thicker (like the ones on top iced in red) were less messy as there was more cookie to grab onto, and my fingers didn’t need to touch the icing.
**Glaze icing dries hard if you let the icing air dry for 12 hours before stacking cookies or packaging them.
*** No piping the edge required
****Will work with Royal Icing as well
*How do I get red icing RED? I use Americolor Food Coloring.
HERE IS A VIDEO ON ICING CONSISTENCY
This is helpful for you to see how easy it is to make the icing thicker or thinner so you have the consistency you desire most.
For best results and no goofed-up icing, allow the iced cookies to dry on baking sheets for 12 hours (then test one cookie with a toothpick to see that the icing is hardened).
Then you can stack the cookies on a tray or wrap them up if you prefer.
There are other options to apply glaze icing to cookies…
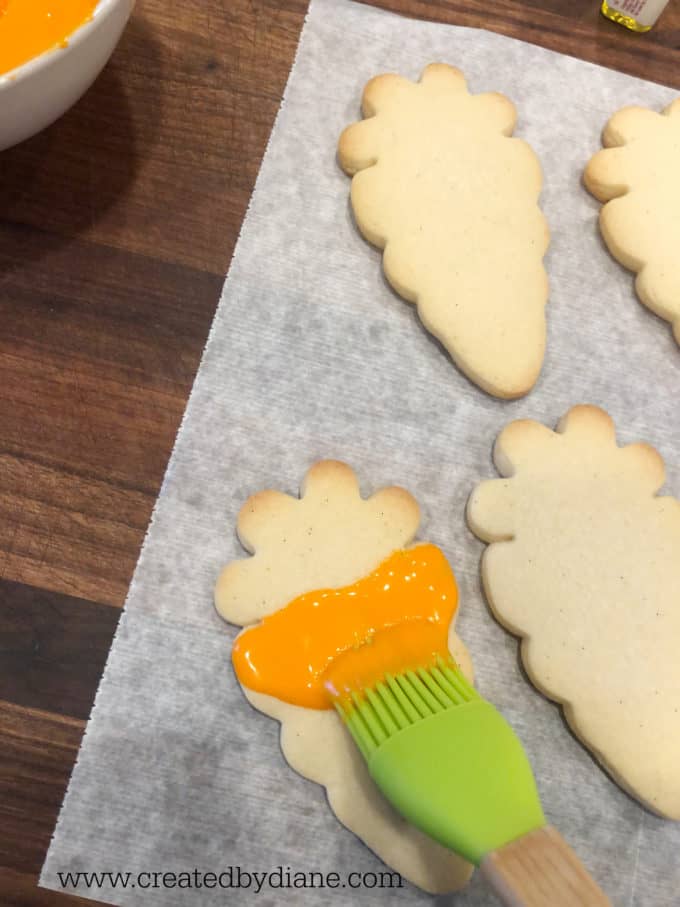
You can use a silicone brush to slather the icing on the cookies, it works well.
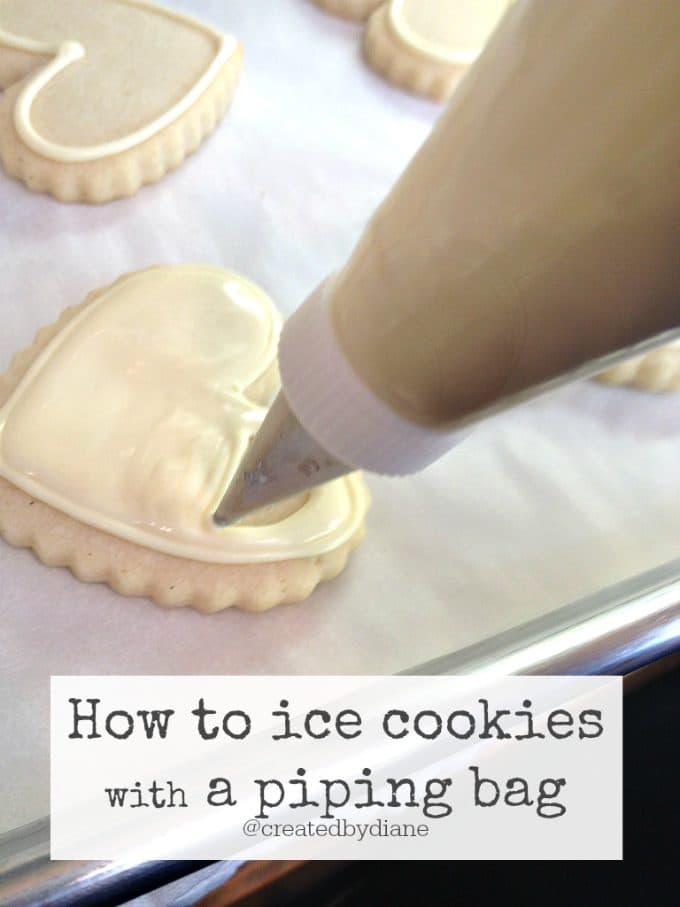
And if you’re looking for info on using a piping bag to ice cookies, check this out.
WATCH VIDEO BELOW…
Keep scrolling after the recipe, there is more info on cookies below!
What types of icing is best for cookies?
I use two different types of cookie icing, glaze icing, and royal icing.
American buttercream frosting can also be used on the cookies, allowing it to firm up before stacking.
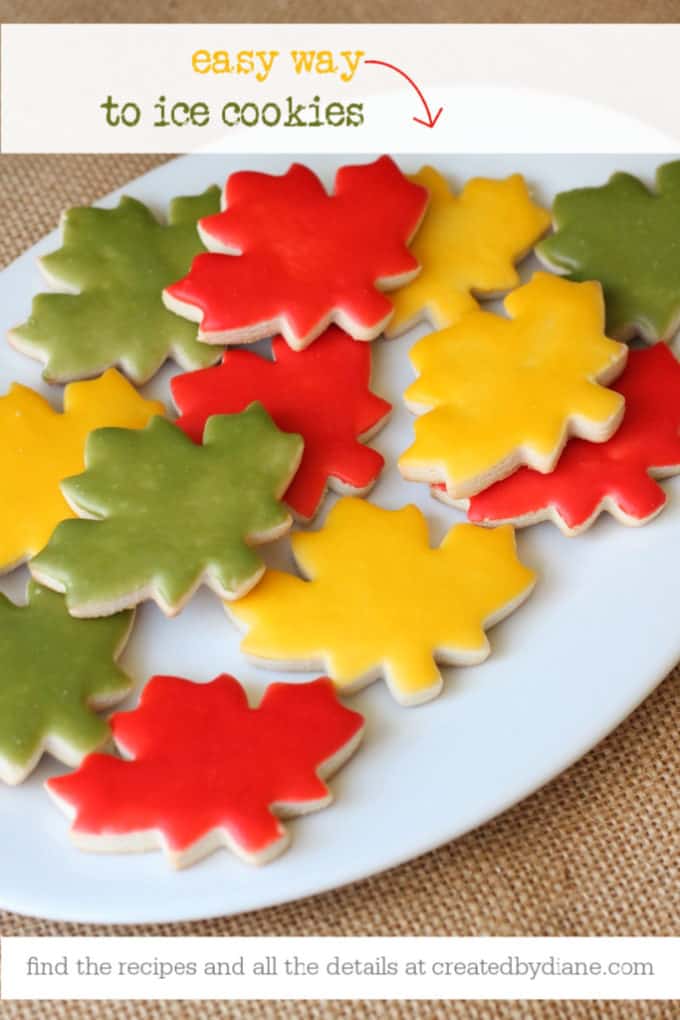
Another great way to ice cookies is to simply DRIZZLE the icing over the cookies. It takes minutes, and as you can see they look so pretty. Selecting a great color for the icing will make them really stand out. Use a fork or spoon and have the icing at a consistency so that it will run easily and move back and forth over the cookies. It’s a simplified way to decorate a lot of cookies. I did 8 dozen cookies in minutes.

Glaze Icing Recipe
Ingredients
- 4 cups powdered sugar
- 1 tablespoon corn syrup
- 2 tablespoons water more may be needed *add more water until you reach the consistency you want
- 1 teaspoon vanilla extract or flavor of your choice
- a few drops of food coloring I use Americolor gel colors
Instructions
- Mix the powdered sugar along with corn syrup and water and extract until it's smooth and creamy.
- The glaze worked best when it was not runny. I ran my spatula through the icing and drew a line, it took about 5 seconds for it to fill back in where I drew the line. Adjust the water so it's fluid, but not runny. (Add a tablespoon of water at time and mix well after each addition, it's easy for the water to absorb the powdered sugar and become runny, if that happens add a tablespoon of powdered sugar and mix well, try again to get to a 5 second count).
- Extract and food coloring are both in liquid/gel form, so adjust accordingly if you add more, you may need more powdered sugar.
If by chance you are looking for a low-carb option, THIS is where you will find my low-carb cookie and frosting recipes.

- cookie tips guide
- how to bake perfect cookies
- Easy Cut Out Sugar Cookies
- Cookie Dough Recipe that holds its shape
- Soft Sugar Cookies and Frosting
- How to ice cookies with a piping bag
- Brush on glaze icing
- resources, recipes, items, and instructions for baking perfect cookies
- royal icing recipe

Take a look at this, make these Cookies all with ONE dough.
How to bake perfect cut out cookies
If you like this or any other recipe on Created by Diane be sure to share the post with the ones you love. You can click on the “share” buttons on the top and the bottom of each post, you can share it on social media or in an email.
Thanks for being such loyal readers, I truly appreciate it!
~Diane
Awesome going to b try this today. I’ve already baked my cookies! (Yesterday) I can’t wait to try. I’m a newbie to the wonderful world of cookie Art and just learning to pipe and flood. Hence, I havery got to try this method. (Save me he’s in time)
I would love to learn how to make this kind of frosting. It appears to be a faster method than the way I’ve frosted cookies for over 50 years. Even at my age, I still bake lots and lots of cookies and one is never too old to learn.
Not sure if you still read this, but I am at a complete loss with your recipe. I end up having to add about 4-5 (maybe more) tablespoons of water in order to get any sort of liquid consistency. Otherwise it’s just clumped up powdered sugar. Am I doing something wrong?
It is difficult to mix, but before you add all that water….try a tiny whisk or mini spatula and just keep mixing it. If you add all that water the icing will slide off the cookies, it’s not supposed to be runny. Add a very small amount of water at a time and mix and mix and mix. putting water in a bottle that drops comes out of is helpful, an eye dropper too. This video I did may help https://www.youtube.com/watch?v=hgvDhLFc1Mg let me know how those tips work out for you.
I may have missed it, but can you continue to add detailed decorating after cookies have been iced/glazed? Amazing tip. Thanks for sharing!
Yes you can add details on the wet icing if you want a wet on wet application or wait until the first layer dries before applying details to have a raised effect with the icing.
Any tips to keep colors from bleeding?
I use Americolor colors and find I only have bleeding when the icing has extra water that was not mixed fully together. If it’s black or red and the cookie will have that color against another color I allow it to dry first. Also using a small space heater to dry them faster works well. The more practice the less bleeding I’ve had, sad but true.
Hi Diane, I have seen this method done in a bakery where the lady was glazing tons of cookies – I have always wondered how they did it, thanks for posting this(long ago) haha. I have a birthday party coming up and need to ice about 200 cookies. I have always used royal icing and the piping method but I am going to try this glaze method since the amount of cookies is so much. I want to save as much time as possible. I was wondering, after letting them dry completely (I also am going to pipe details on top with royal icing after) is it ok to freeze the completed decorated cookie until the party? I am planning to do them a week in advance.
On the Bake at 350 blog she states it’s ok to freeze royal icing decorated cookies but I am wondering about this icing. Have you ever tried freezing cookies?
I have frozen cookies after icing them to see how they are. The glaze iced cookies I froze for a month, were defrosted and tasted just as if they were just baked and the glaze icing was nice on all of them. I’ve also baked and frozen the cookies, thawed them and then iced them will good results too.
THANK YOU, THANK YOU, THANK YOU!! I iced 140 cookies today using your tip. It was amazing. Saved me so much time, and they look better (in my opinion) than the outline flood method! So thank you again for sharing!!! This will now be the only way I will ice cookies!
So happy to hear it worked well for you and I agree it’s a huge time saver when icing lots of cookies!
You are ingenious! This is so clever I am excited to try it out!…p.s.your blog looks beautiful.
Dear Diane, how fast will the royal icing harden on the dish? Do you need to stir it between cookies so that it remains usable? Thanks for sharing such a great idea! Kind regards, Mariana.
Once I have all the cookies ready to go into the icing, I just keep dipping them and placing them on a rack.The icing won’t crust over unless you stop dipping cookies, if you need to then stir it up. If you take a break, place plastic wrap on the dish (touching the icing) so it doesn’t crust over 🙂
LOVE this! I long to be able to decorate cookies. I’m afraid my piping skills leave a little, okay, a lot, to be desired.
This is GENIUS!!!!
Helpful? Try life changing. Thank you!
Diane, I make this frosting only with milk instead of water. After my cookies dry they seem to get spots on them. Is this because of the milk? They dry nice and smooth but the spots are kind of unsightly.
Yes, it is because of the milk. If you get spots with water, it’s because it’s humid usually. Milk can leave swirls and spots easily, that is why I prefer water.
Diane, I just ran across your great tip! I haven’t decorated cookies in MANY years. Now that I have a little 4 month old granddaughter with a baptism coming up, I’ll be making christening gown cookies. I’ll use your glaze recipe and technique, and then I’ll attempt sweetsugarbelle’s lace technique. I admire you for pushing yourself through the shoulder pain and adapting. I’ve been dealing with elbow/shoulder pain for a year, so I can totally relate. I hope your shoulder issue has now resolved! Thank you, thank you, thank you for being so generous with your talent. You are an inspiration to me.
I worked in a bakery for many years and this is the way we always iced our cookies. We used meringue powder instead of syrup and a clean finger to help with removing excess icing. Thanks for sharing.
Hi, all is going nicely here and ofcourse every one is
sharing information, that’s in fact fine, keep up writing.
Great trick !
I usually don’t have small icing bags at home, so this one is very handy
I use this same basic icing and use a NEW paintbrush to paint the icing on the cookies. it works really well and you can paint to the edges but not have it run off the cookies.
great idea!