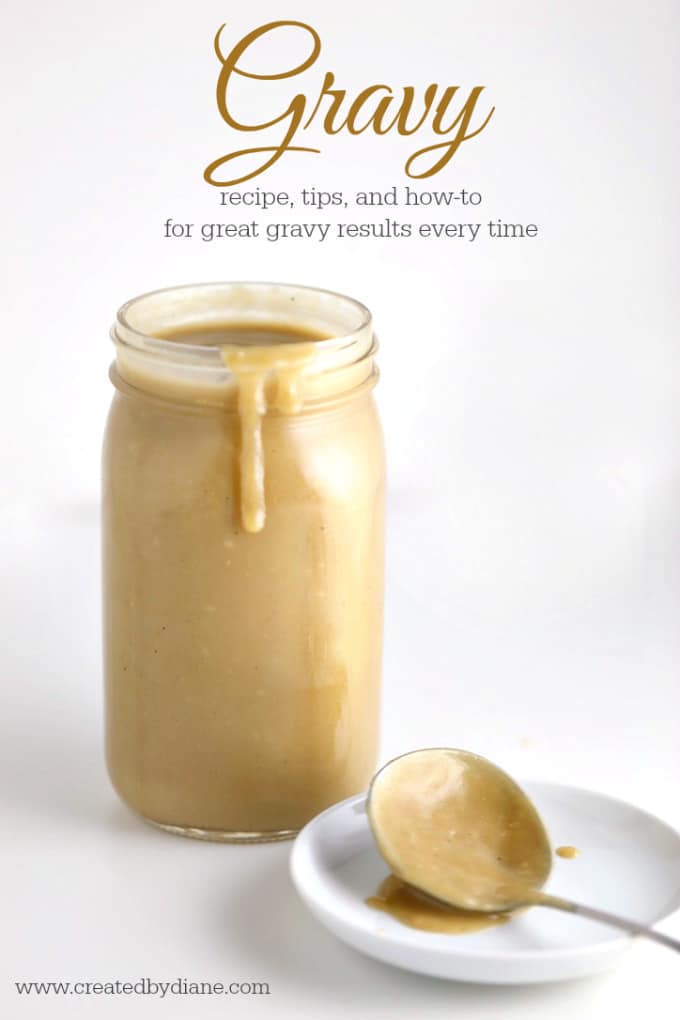
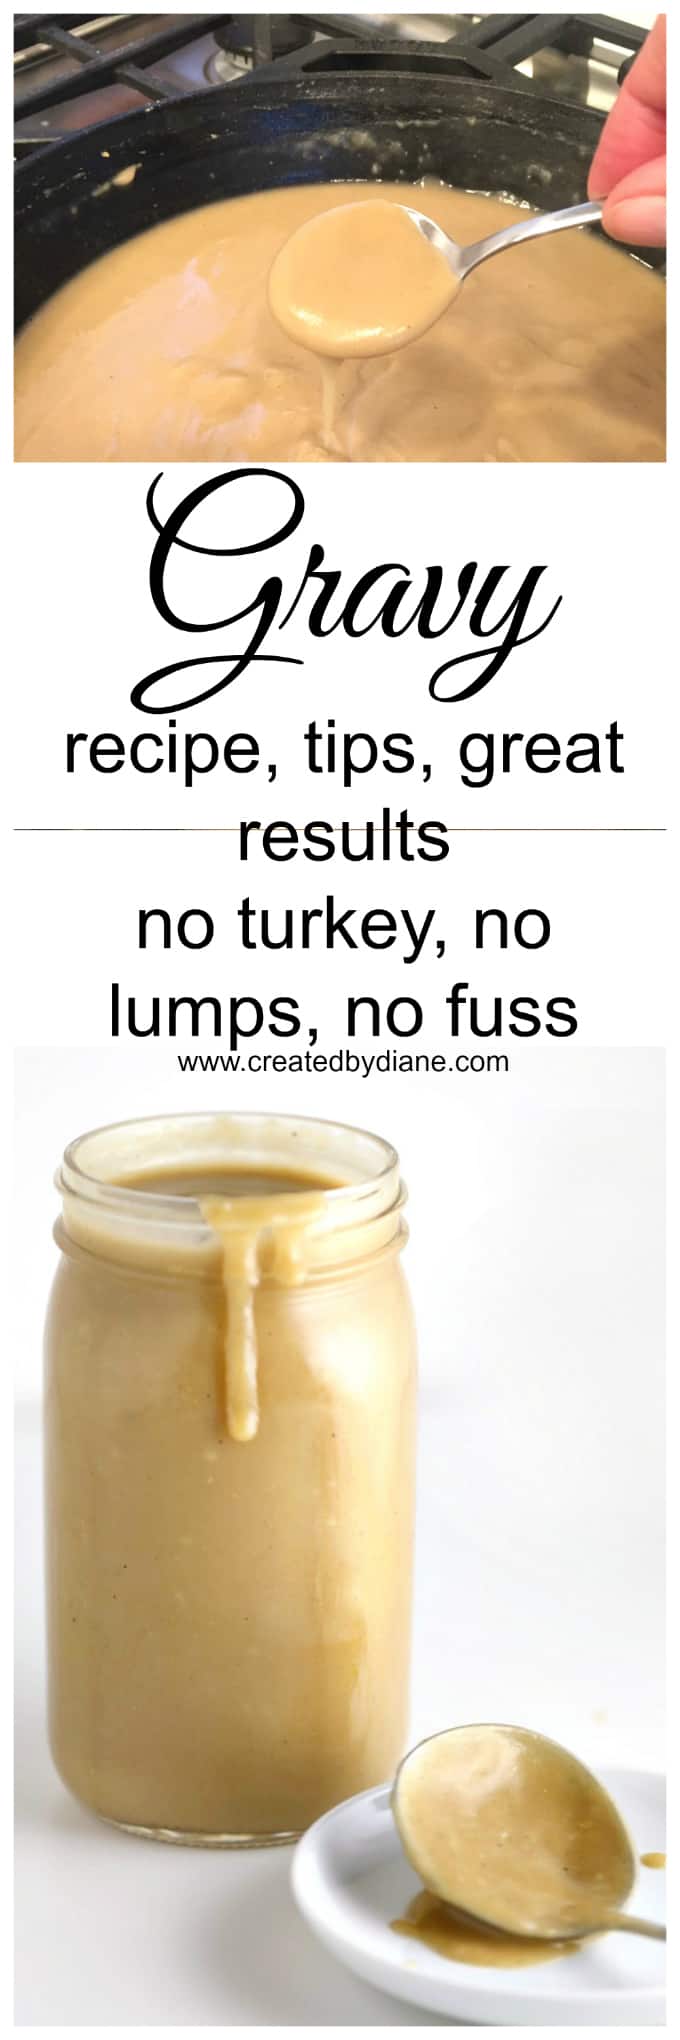
How to make GREAT Gravy
I know there are lots of gravy recipes out there, most use drippings from cooking a chicken, turkey, or beef. You won’t need any of those for this gravy, and I also include a vegetarian option in the recipe.
There are MANY times when you may want gravy,
Thanksgiving is one of the most popular times of year when gravy is the topic of discussion.
There is nothing like hot gravy dripping out of the mashed potatoes and running over the top of roasted turkey.
If you want to see how I slow roast a turkey overnight click here.
But there are other times as well, weeknight dinners and top dunk your french fries into.
You can adjust this gravy from CHICKEN to BEEF by just swapping out the flavor of the chicken broth, chicken stock, or chicken bouillon to the beef variety.
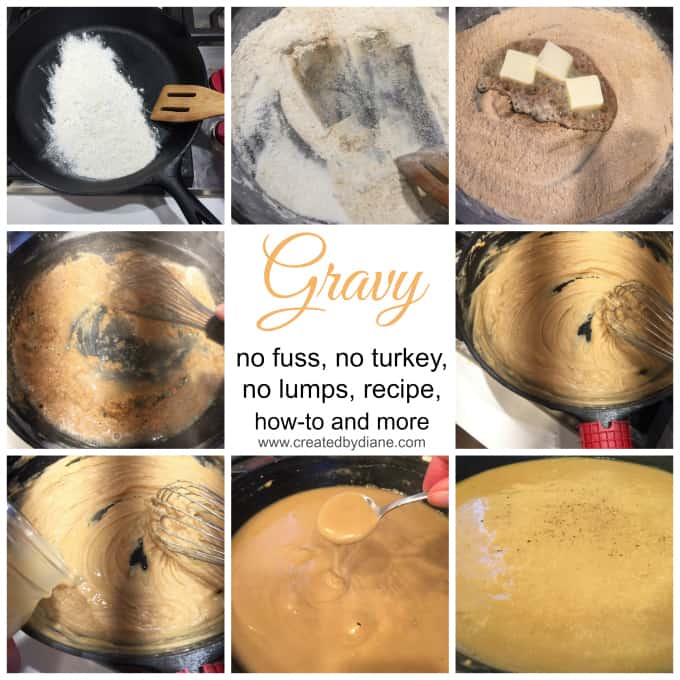
The printable instructions are below, as the photo above shows, you will brown the flour, then add in the butter then while you slowly add in the liquid, you whisk it until it’s smooth and keep adding the liquid slowly to create a thick gravy. Simmer it, give it a taste, add salt and pepper.
There is no need to have roasted a whole turkey for gravy if you want to add some of the dripping from a turkey, chicken or beef just take the drippings and allow them to cool a bit and settle the fat to the top then skim off the fat and add it to the gravy.
If you have lumpy gravy and didn’t whisk it enough, try adding a little more liquid and whisk again, or put it through a fine strainer and press out the lumps with the back of a spoon.
How to make the gravy thicker
If you are looking for really thick gravy or sauce, and have first started with a roux of butter and flour, and then slowly added the liquid and stirred and simmered it, there is another way to thicken it even more. Use a slurry of cornstarch and water (1/4 cup water 2 tablespoons cornstarch)
If you think a little more time might make it thicker, just simmer it so the steam releasing will make it thicker, you can also start making a new roux (butter and flour) and add the thin gravy to it slowly so it stays thick. If you’re still having trouble, you can add the slurry of water and cornstarch (1/4 cup water 2 tablespoons cornstarch) mixed well or shaken in a jar to be sure it’s mixed well, then slowly drizzled into boiling gravy (or broth). Don’t be afraid to simmer it ) without a lid on, don’t be afraid to use more thickener, it will depend on how much liquid you are using to allow the mixture to thicken to the desired thickness.
If you want to thicken a sauce or soup, the same principles apply, I often add a cornstarch slurry at the end of cooking a creamy soup to make sure it’s really thick, and even add some heavy cream to give it a great consistency.
More info on making thick sauces, gravy, and soups here.
How can I make gluten-free gravy?
If you are gluten-free, you can start your gravy with gluten-free flour or make the gravy with pan drippings and a cornstarch slurry.
Adding flavor to the gravy
If your gravy doesn’t have enough flavor try adding some pan-grilled onions or vegetables (carrots and celery). Then puree the gravy with an immersion blender.
Add in some wine, you can use red wine if you’re serving the gravy with a meat dish or wire wine to go with chicken, pork or turkey. Start with 1/4 cup of wine and increase it to 1/2 cup.
Add mushrooms to the butter and saute them for a minute to make a great mushroom gravy and red wine goes great with mushroom gravy as well.
If you want beef gravy, use beef broth, and if you want to deepen the flavor add a tablespoon of soy sauce or a teaspoon of Worcestershire sauce.
Add some fresh garlic for a great flavor, start with 2 teaspoons garlic.
Fresh herbs always add a great flavor, use some chopped parsley for a subtle flavor, add a tablespoon of chopped rosemary for a great unique flavor.
Add a 1/2 teaspoon dry mustard or prepared mustard to the gravy for some added flavor, and if you try dijon mustard it goes great with white wine in the gravy.
Don’t forget to add salt and pepper to taste at eth end of cooking the gravy to be sure it is well seasoned.
Gravy is one of those items you can make the day ahead when serving a large meal like on Thanksgiving, simply refrigerate it overnight and reheat it the next day. It’s great to have time-saving recipes on days when you’re so busy in the kitchen.
Freeze it in ice cube trays and you’ll have a quick small portion whenever needed.
* If you’re looking for biscuits and gravy style gravy, saute sausage in a skillet, then add the butter and flour. Next, you’ll use milk or cream instead of broth. Whisk and cook until the gravy thickens and you will have traditional gravy for your biscuits.

great gravy every time
Ingredients
- 1/2 cup flour
- 1/4 cup butter
- 4 cups chicken broth chicken stock or water and bouillon
- salt and pepper to taste
- optional items:
- onion soy sauce, Worcestershire sauce
Vegetarian option in notes.
- *additional water as needed.
Instructions
- *Heat the chicken broth for quicker results in making the gravy.
- Place flour in a skillet on medium to high heat stir flour and allow it to brown, depending on your pan this can take 5 minutes in a cast iron pan or 10 minutes or so in a stainless steel pan.
- Add in the butter and stir with the flour to combine as it melts.
- With a whisk about 1/2 to 1 cup of broth at a time, slowly add the liquid so that the gravy remains thick, adding too much liquid at a time will take the gravy longer to thicken up. this is not a problem if you are making the gravy a day ahead of time, as it cools and you refrigerate it, the gravy will thicken, if you are serving it immediately you don't want it too thin out too much as it could take a long time to simmer and thicken if you prefer your gravy thick.
- You'll whisk the roux (butter and flour) while you're adding the broth until it's all incorporated, then simmer 5 minutes or until the desired thickness.
- Add salt and pepper to taste.
- Add additional flavor as desired.
- Add an additional cup of water or two to achieve the flavor that you like. I often add an additional cup depending on the type of broth or bouillon I use.
- fresh herbs are also nice, basil, thyme, oregano.
- *Be sure to use a chicken broth, stock, or bouillon you like the taste of, you can use more bouillon for more flavor, or add a tablespoon of soy sauce or a teaspoon of Worcestershire sauce for a nice alternative flavor that will be more complex than just chicken flavor.
- *if adding onion, finely dice 1/2 an onion and add it after you add and whisk in the butter. When you're finished making the gravy the onion should be soft enough to be almost invisible and not create lumps, but you can puree the gravy with an immersion blender if needed.
Notes
I recall seeing the browned flour method years ago on TV, but don’t recall exactly what show it was. I’m glad to have made gravy like this for times I need more gravy, to save time and make the gravy ahead of time and for any time I have fries and want to dunk them into gravy, which around here is kinda often and I love fries and gravy.
I always get lumps in my gravy :(. I hate the whisk and i don’t have enough patience to smooth them with a spoon. But putting it in a blender never crossed my mind lol, thanks for the tip!
In the gravy recipe instructions, there is no direction for when to add the butter. It says “Brown the flour in the skillet” — so, melt butter, add flour? It doesn’t look like it in the photo. Are those little squares in phote three the butter? So brown flour, then add butter?
sorry, the instructions weren’t clear, the butter is in the third photo.
Heat the flour and brown it, that is what will give the gravy a great flavor. Then add in butter and mix it with the flour as it melts, I do this with a whisk, then begin adding the liquid and stir as you add it to create the gravy.
I really want to try your overnight roasted turkey recipe and your gravy recipe but when I hit print I only get the pictures not the recipe. Is there a trick that I don’t know so that I can get them?
I double checked to see that the “print” options are working and they are. Here is the print link for the turkey https://www.createdby-diane.com/easyrecipe-print/12349-0/
and here is the printable link for the gravy https://www.createdby-diane.com/easyrecipe-print/19959-0/
I’m not sure why they wouldn’t be working for you, but sometimes technology can be tricky. If you have any other problems getting something to print, you could copy and paste the info in a document and then print it, or message me and I’ll can see if I can send you something that will print, like the direct link as I did here.
I did your upside down, slow roasted method today. I put it in the oven @ 11:00am, (knowing we would be out till later this evening). We got home around 10:00pm and I was concerned it had overcooked (bc the turkey smell was very concentrated and strong).
The meat was sooooooo tender!! The dark meat, (my favorite), was amazing!! Hubby likes the white meat, and even though I thought it looked dry, he said it was great!!
(And, that was all without gravy!! I’m making that tomorrow) 👍
Turkey #1 done and #2 is defrosting as of tonight. Our Christmas dinner isn’t until December 29th, so everything is getting frozen and reheated in a slow cooker with lots of chicken stock to keep it moist. (It works every time! Plus, it gives you extra liquid for making more gravy!!!!)
Thanks Diane for sharing your tips and tricks!! I’ll be trying this method again with the next one too.
One question though……..does it work as well for a STUFFED turkey? This one was not…… I’m afraid the stuffing would either dry out or be soggy
I’m so happy it turned out ok, I have not done it with a stuffed turkey, it’s not really recommended, and I’m not sure if it would dry out or be soggy. I usually just bake the stuffing in a dish.
Hi Diane,
You know me by now..The following is referenced to flour/ cornstarch..
When I began reading your article on gravy you initially mentioned cornstarch and the rest including the recipe elsewhere was flour.
In my brief cooking career flour has been my demise..My New England clam chowder is great but it has to be thicker..Somewhere between chicken soup and stew so the spoon will slowly move downward from being vertical..
I think the cornstarch will do this .. Flour’s taste lingers too long to suit me ..
Bottom line.. Please tell me that you are using 🌽 cornstarch and not flour.. LOL
Hello Robert,
For basic gravy, I use flour and butter (roux) then add the liquid slowly while whisking.
If I want a soup to thicken I use a cornstarch slurry (which I also add to large portions of gravy if the roux is not thinking it enough) You can add as much cornstarch slurry as needed to get the desired thickness if you’re making 6qt pot of soup, you need more than if you’re making a 4qt pot of soup. If it’s a cream soup like chowder add in some heavy cream so the consistency will result in a velvety creamy soup. If you want to chicken soup to the consistency of stew start with 2 tablespoons cornstarch mixed with 1./4 cup or more water so you’re able to mix it smooth and drizzle it into the simmering soup.
Flour added to a soup will taste like flour unless you cook it first, as shown in the photos I have of making the gravy from a roux, that is why cornstarch works really well in soups. Cheese sauce tastes better with a roux and the consistency is better too.
So my go-to rule of thumb is if it’s a gravy or cheesy, or creamy soup, start with a roux, if it’s a clear “sauce” like Chinese food sauces or soup, no need to use a roux a cornstarch slurry will work well.
Hope that helps!
I have more thickener ideas for soups here https://www.createdby-diane.com/2020/03/making-homemade-soup.html
~Diane